Or search by topic
Number and algebra
Geometry and measure
Probability and statistics
Working mathematically
Advanced mathematics
For younger learners
Making Maths: Clinometer


A clinometer is a tool that is used to measure the angle of elevation, or angle from the ground, in a right - angled triangle. You can use a clinometer to measure the height of tall things that you can't possibly reach to the top of, flag poles, buildings, trees. Follow the directions below to create your own clinometer.
You will need:
- A protractor with a small hole on the centre spot or
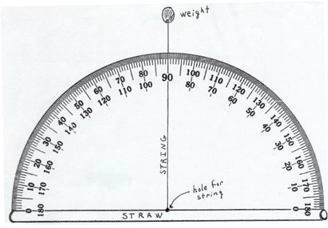
- Print out of paper protractor (see below)
- Poster board or card board (can be from a box) to back the protractor
- 20 cm or about 8 inches of string or strong cotton
- Weight - such as a metal nut, paper clips or a small piece of clay
- Glue and Scissors
- A straw
- Clear Tape
- Items marked with the red check are needed with either type of protractor.
Directions:
- If you are making a protractor, cut out the copy of the protractor.
- Get the piece of poster board or an empty box. Stick the paper protractor on top of the card and cut the joined pieces.
- Get the straw and tape it to the straight edge of your protractor that you made above.
- With your pen or pencil, poke a hole through the center of the protractor where it meets the straw. Push the string through the hole and tie a large knot on the other side so it won't pull through.
- Tie your weight to the other end of the string.
To use the clinometer:
The diagram shows what the assembled clinometer will look like when laying an a flat surface. When using it, the straw will be on the top.

You will need two people: one to look through the straw and site the top of an object and one to read the degrees that the string makes with the protractor.
- Find a tall tree (or building, flag pole etc.) in a place where there is plenty of space to move away from the object that you are measuring.
- Look through the straw and find the top of the tree.
- Ask your friend to read the angle being recorded on the clinometer. This is read where the string or cotton is touching the protractor.
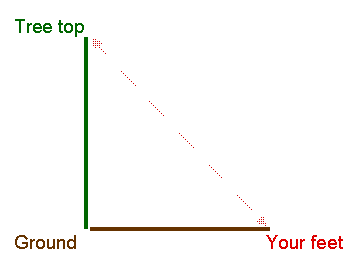
- Keep moving back (or forward if you've gone too far) until you have the clinometer angle measuring 45 degrees. With a 45 degree angle your job will be much easier as the distance from you to the tree will be equal to the distance from the ground to the top of the tree.
- Measure the distance between where you are standing and the base of the tree.
- Measure the distance from your eyes to the ground (this is where your partner is indispensible!)
- Add these two distances together - because to be most accurate the triangle has to finish at your feet not your eyes.
- You now have a very close approximation of the height of the tree, building or other tall structure.
You, the base of the tree and the top of the tree, form an isosceles triangle meaning the distance from you to the base of the tree is equal to the height of the tree (from the viewer's eyes to the top).

You may also like
Marbles
I start with a red, a green and a blue marble. I can trade any of my marbles for two others, one of each colour. Can I end up with five more blue marbles than red after a number of such trades?
More Marbles
I start with a red, a blue, a green and a yellow marble. I can trade any of my marbles for three others, one of each colour. Can I end up with exactly two marbles of each colour?
Rolling Triangle
The triangle ABC is equilateral. The arc AB has centre C, the arc BC has centre A and the arc CA has centre B. Explain how and why this shape can roll along between two parallel tracks.

