Pinhole Camera


Why do this problem?
This problem is linked to the project Observing the Sun and the Moon, from our STEMclubs projects. Observing the Sun is interesting but potentially dangerous - no one should ever observe the Sun directly with the naked eye. One way round this is to use a pinhole camera.
The science
The principle of the pinhole camera is the principle behind all cameras. Pinhole cameras are an example of the camera obscura, which is Latin for a vaulted room (camera) which is dark (obscura). A camera obscura projects an image of its surroundings onto a screen, and is an early fore-runner
of modern photography.
The pinhole camera (and camera obscura) works by reflecting light off an object which is then focused onto a surface, creating an image of the object on the surface. Focusing would be via a lens in a modern camera, but in the pinhole camera it is the pinhole which focuses the rays of light.
The maths
In situations where we might use a camera, light rays travel in straight lines which means we can use geometrical principles to investigate what is happening in the pinhole camera.
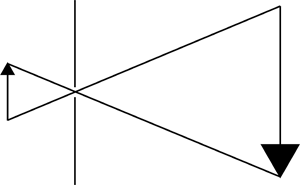
The diagram on the right illustrates how the pinhole camera works. The upright arrow represents an object. Light rays travel from the object through the pinhole and onto a surface on which the image of the arrow can be seen.
Using similar triangles, we can work out how big the image will be and we can also see why it will be upside down compared to the original object.
Possible approach
Students should be encouraged to make their own pinhole cameras, and to find out how the image appears in relation to the object by experiment. Once they have grasped that (a) the image is upside down, and (b) that its size varies depending on where the pinhole and the image surface are placed relative to the object, then data can be collected.
Experimentally, it is good practice to clarify what the variables are - for a given object, these are the distance of the object from the pinhole, the distance between the pinhole and the image surface, and the height of the image. Either the distance of the object from the pinhole or the distance of the pinhole from the image surface should be kept constant. The other distance will
then be the independent variable, with the image height the dependent variable.
Graphing the results should produce a straight line, indicating a linear relationship.
A diagram like that above will help them to understand what is going on, and how the heights of the objects and the image relate to each other.
Key questions
- Why is the image upside down?
- If I move the object relative to the pinhole and the image surface, how does the height of the image change?
- What are the variables in this experiment? Which are the independent variables, which the dependent? Why do we need to hold one of the independent variables constant?
Possible extension
Challenge students to explain with a diagram why a large hole will give a bright but fuzzy image, while a small hole will give a sharper, but less intense, image.
Possible support
Suggest students start by varying the position of the screen only, keeping everything else constant, and see what effect this has on the height of the image.