Skip over navigation

How would you work out the area of a circle like this?
You may be curious to find out...
You could download this sheet of circles to play around with some ideas.
Read further to see how others started this challenge...
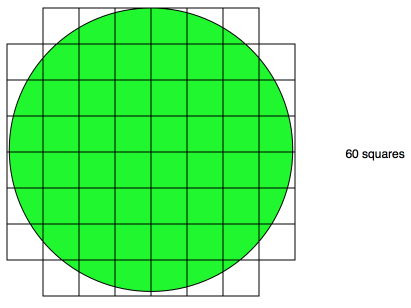
Raj used a method that he often uses when finding the area of shapes:
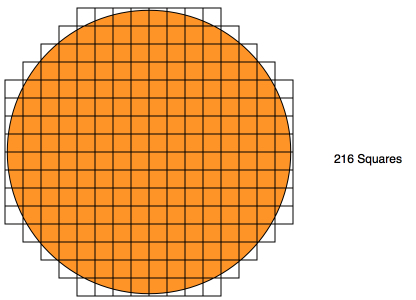
Fran tried a different idea:
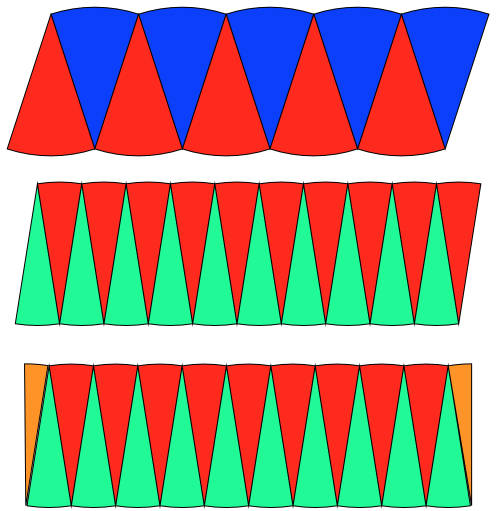
Jay tried cutting up the circle:
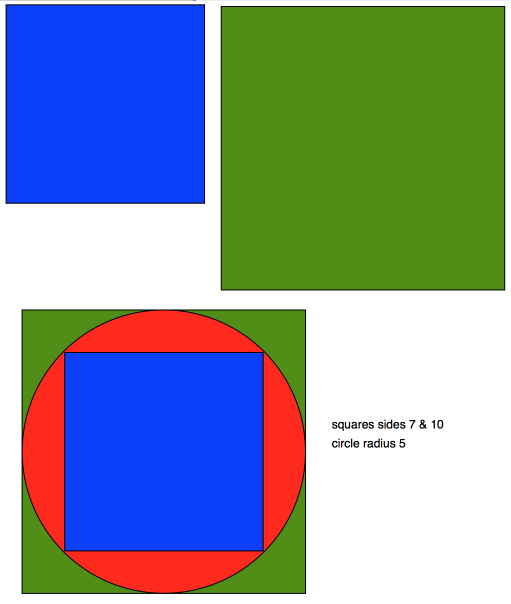
Michelle had another idea:
What do you think about each of these four ways of finding the area of a circle?
Which do you think is 'best' and why?
Do let us know about any other methods that you devise too.
This activity is designed to nurture children's curiosity by introducing a new context in which to think about area (a circle as opposed to a rectilinear shape). The aim of this task is not to introduce pi, rather it is intended to be a novel situation in which learners can apply what they already know and make use of their problem-solving skills. Children might end up pursuing different
ideas from each other and this freedom to explore may well encourage learners to persevere more than they might usually. This activity lends itself to pupils posing their own questions in the form of “I wonder what would happen if...?”. (The further note at the foot of this page offers more support on curiosity in the classroom generally.)
As the class is working, circulate and listen out for observations that you could write up on the board for all to see. These might relate to methods that they are trying, or ways of recording, or 'noticings'...
After some time, you could bring everyone together for a mini-plenary to share ideas so far. At this point, you could reveal the four different ways of approaching the task given in the problem itself, if they have not already come up in discussion. You may want to give pupils the choice of either pursuing their own different method, or engaging with these example methods.
The main plenary could focus on a brief review of all different ways of finding the area that you have seen and a discussion of the advantages/disadvantages of each. The class' work would make an engaging display for the classroom.
What ideas are you trying out?
What are the advantages of that way of working out the area? What are the disadvantages? Why?
The Rise and Fall of Curiosity - the extract from 23.50 to 37.15 on adult encouragement and teacher behaviour is particularly worth viewing
The Hungry Mind: The Origins of Curiosity - the extract from 8.22 to 12.29 on children asking questions is especially useful.
Or search by topic
Number and algebra
Geometry and measure
Probability and statistics
Working mathematically
Advanced mathematics
For younger learners
Circular Area
Age 7 to 11
Challenge Level 


- Problem
- Getting Started
- Student Solutions
- Teachers' Resources
Circular Area

How would you work out the area of a circle like this?
You may be curious to find out...
You could download this sheet of circles to play around with some ideas.
Read further to see how others started this challenge...
Raj used a method that he often uses when finding the area of shapes:
He put a square grid over the circle. He counted 60 squares but then he had to decide what to do when the squares were not completly over the circle.

Fran tried a different idea:
Fran used smaller squares than Raj. She used 216 but she noticed that some of the squares overlapped the circle at the edge.

Jay tried cutting up the circle:
Jay cut across the circle going through the centre. He coloured the segments to make them easier to see, then put them together:

Michelle had another idea:
She made a square that just fits inside the circle and a larger one that just enclosed the circle. She worked out the area of each square and then took the average.

What do you think about each of these four ways of finding the area of a circle?
Which do you think is 'best' and why?
Do let us know about any other methods that you devise too.
Why do this problem?
This activity is designed to nurture children's curiosity by introducing a new context in which to think about area (a circle as opposed to a rectilinear shape). The aim of this task is not to introduce pi, rather it is intended to be a novel situation in which learners can apply what they already know and make use of their problem-solving skills. Children might end up pursuing different
ideas from each other and this freedom to explore may well encourage learners to persevere more than they might usually. This activity lends itself to pupils posing their own questions in the form of “I wonder what would happen if...?”. (The further note at the foot of this page offers more support on curiosity in the classroom generally.)Possible approach
Try not to say too much as you introduce the task and encourage learners to decide for themselves what resources they might like. Do your best to accommodate their requests and set them off to explore, perhaps in pairs. You could print off copies of this sheet of circles for learners to use.As the class is working, circulate and listen out for observations that you could write up on the board for all to see. These might relate to methods that they are trying, or ways of recording, or 'noticings'...
After some time, you could bring everyone together for a mini-plenary to share ideas so far. At this point, you could reveal the four different ways of approaching the task given in the problem itself, if they have not already come up in discussion. You may want to give pupils the choice of either pursuing their own different method, or engaging with these example methods.
The main plenary could focus on a brief review of all different ways of finding the area that you have seen and a discussion of the advantages/disadvantages of each. The class' work would make an engaging display for the classroom.
Key questions
Tell me about what you're doing.What ideas are you trying out?
What are the advantages of that way of working out the area? What are the disadvantages? Why?
Possible extension
For those pupils who are confident and work well on this kind of task, you could ask about other shapes with curved sides. You might expect some learners to offer clear reasons for deciding which methods are better than others, perhaps in terms of accuracy.Possible support
Some learners might be a bit overwhelmed by being asked to explore several different methods. You could just introduce one at a time to give them chance to immerse themselves in each fully.Further note
You may be interested in the following talks given by Professor Susan Engels, which focus on encouraging curiosity and are available on YouTube:The Rise and Fall of Curiosity - the extract from 23.50 to 37.15 on adult encouragement and teacher behaviour is particularly worth viewing
The Hungry Mind: The Origins of Curiosity - the extract from 8.22 to 12.29 on children asking questions is especially useful.

